How To Treat Rope For Shibari
- Christian Red
- Jul 29, 2025
- 8 min read
Updated: Sep 16, 2025

When you buy natural fibre rope, usually jute (sometimes hemp) for shibari, it comes in two forms, treated or untreated.
Untreated is usually cut straight off a spool, and as a result, it's stiff, hairy, dry, and may contain chemicals that are bad for you. Untreated rope is not particularly pleasant to handle and can feel unnecessarily harsh against skin.
So why not just buy treated rope? You can (and I’ve done it myself), but untreated rope is usually a lot cheaper and treating it yourself means you can prep it exactly how you like it. If you wish to see any of these stages in more detail, I made a tutorial video here.
Cutting Rope to Length
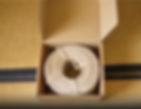
The first thing to do is open up the reel of rope so I can start making some lengths. If you are processing a reel like this, you'll notice that it kind of wants to fall apart. A little trick I use is placing it inside an open box to help keep its structure intact. If you're using a spool, even better - just stick something through the centre and let it turn itself as you work.

Everyone has different preferences, but I prefer my lengths to be about 7.5 to 8 meters. Rather than carrying a tape measure on me the whole time, I cut one length of rope to the size that I want it, and then I'll use that length of rope like a stencil to measure the other lengths, so all of my lengths of rope end up the same.
The last thing I want is for my ropes to unravel whilst I'm treating them, so I like to tie a quick overhand knot on each end. This does involve unravelling a few centimetres of the end, but this saves it whilst I’m treating it.

Once the knot is tied, I can flatten these down further by rubbing them between my hands and pulling them a little bit tighter.

We can put nicer ends on (like thistle knots) later, but now that the rope ends are protected, we can start doing some actual treatment.
What Do We Want To Achieve?
There are many opinions on the best way to treat natural fibre rope. I find it easier to approach treatment as 'what physical changes do I want to make to the rope?'
I want any carcinogenic chemicals out of the rope
I want the rope to feel soft and pliable, so it's easy to tie knots with, and so it feels better on my partner's skin
I want the surface of the rope to not feel dry
I want the surface of the rope to look smooth and not covered in fuzzy stray hairs.
Whilst making these changes, I don't want to do anything that will dramatically weaken the rope.
Removing Chemicals
Let's start with the chemicals: why are there chemicals in our rope? When jute is batched up before being made into yarn, jute batching oil (JBO) is used to make the fibres more pliable and easier to process during yarn production. However, a lot of JBO is carcinogenic, aka it can contribute towards cancer. Also (but less importantly), JBO smells awful.
You can get it out in various ways: steam it out, bake it out, or boil it out. One of the least impactful ways I've found is covering the rope in boiling water in a non-metallic container (Thank you to Ro-nin for this tip).

I then leave the rope for 30 to 45 minutes. I suggest doing this outside if you can, or at least in a well-ventilated area. After that time (once you’ve noted how gross and yellow the water looks), tip the water away, then rinse the rope off with some cold water, and tip that away as well.
Drying and Tensioning
Now, I need to dry my rope, and I need to dry it under tension so it doesn't lose its shape. I do this by tying one end around a carabiner.

I then place another carabiner onto a sandbag and go between the two of them until I run out of rope.

I then wrap the ends around all of the existing lines tightly and tuck the end away, like so:

Drying can take about 24 to 48 hours, maybe a little bit longer. When I check in on this a few hours later, you might notice that the sandbag is no longer off of the floor (because the rope has stretched) which means the rope needs to be re-tension. I also switch the rope around so that it dries more evenly and then re-tension it.
I'm not gonna lie to you, this part of rope treatment (wet treatment, as it's known) is the biggest pain of the whole process: it's time consuming, it's gross, and you need to have a lot of space for it to happen. Also, if you live somewhere that's quite damp or wet, like me, finding numerous days in a row where there's no rain can be a big challenge.
Because removing JBO is such pain, you might want to consider buying jute that isn't manufactured using carcinogenic JBO. There are a few suppliers that do this. For example, Koumanawa uses soybean oil instead.
However you got there, you now have rope minus the stinky carcinogenic JBO, and it's very stiff. All rope will soften up with use, but this won't be fun to tie knots with, and it won't feel good on the skin. So let's look at some options for how to change that.
Softening the Rope
Option number one is shoving the rope in the tumble dryer for an hour.
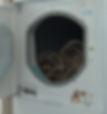
This will leave you with a big old mess, but the rope will be significantly softer having been banged around the inside of a tumble dryer.

Alternatively, if you don't have a tumble dryer, you can do the equivalent of this process manually. I've done this by going through a carabiner, wrapping it around a few times (as below),

Then with straight arms, I pull the rope through the carabiner backwards and forwards.
Once you've done one section, move along and do the next section.
Conditioning
Next, we want to make our ropes less dry, which can help mitigate damage. So we’re going to make some rope butter:

In a saucepan, pour in 100 grams (grams, not ml) of jojoba oil. Gently warm that
Pour in 100 grams of berry wax pellets (grams, not ml)
As that warms up, give it a stir
Once all the pellets have melted, pour the butter into a container. For your own reference, the saucepan cleans up really easily afterwards
Now we just need to let this guy solidify.

And after an hour or so, we’ll have some nice rope butter waiting for us.

So if you’re like me and you hate sticky sensations, you’re in luck. It feels silky to the touch, not sticky (it's quite nice actually). Once I've got a nice little cube of this, I'm gonna run my rope through it - not using massive amounts of pressure.

Some little chips are breaking off as I'm doing this, so it's worth putting something protective down on the floor, like some old cardboard. I'll do this in both directions for each piece of rope. The easiest way to get the butter to absorb into the rope is to apply some heat. If you already have access to the tumble dryer, we can just put it into a laundry bag, zip it up, and chuck it in there for 30 minutes.

Removing the Fuzz
We're on the home stretch now. Our rope is JBO free, it's broken in, and it's not dry anymore. However, depending on the type of rope you use, there might be little stray hairs that are detracting away from the appearance of your rope. What can you do about this? The solution is fire.

For obvious reasons, I'm doing this outside and I'm being very careful when I'm doing it. If you have a gas hob in the house, you might want to use that instead of an outdoor cooking stove like I am. However, it produces quite a smell and also a lot of black sooty material, so bear that in mind before you do it in your house. Also, make sure you've got plenty of ventilation.
Whether doing this outside or inside, I'm being very sure to keep plenty of distance between my hands and the flame, and I'm constantly moving the rope, keeping it taut and constantly rotating so that as much as the surface area of the rope gets in contact briefly with the flame as possible. We just pass the rope through a couple of times each way, and then we're good. There will be some leftover black soot on the rope that I can wipe off with a cloth.
We now have some very, very pretty rope, and I can't wait to start tying with it.

Ongoing Maintenance
Over time, our rope will start to become dry again, especially if you ran it through a flame, especially if you have hot weather, air conditioning, etc.
So we're going to make some delightful maintenance goo.

Once again, we'll heat up some more jojoba oil, but this time the ratios are going to be different. Last time it was 50/50. This time, it's going to be 85% oil to 15% wax. The reason the ratios are different is the oil stops the rope from being dry, but the wax stops it from being fully absorbed. The maintenance goo is made as follows:
Melt together 29g of jojoba oil and 5g of berry wax pellets
Stir together, pour into a container, and let it set
So I just want to take this stuff and I want to cover my rope lightly in it. I can do this with my bare hands or I can put it on a lint-free cloth. The cloth then becomes a nice delivery mechanism for coating the rope – but one method isn’t better than the other. Again, the goo isn't sticky, it's just kind of soft and silky.

Once we've done, we can leave the rope to hang for about 48 hours.

And we are done, my friends!
The only addendum you might want to be aware of is how we can make our rope ends a bit more compact for easy handling. A lot of people switch the overhand knots to thistle knots - I made a nice little video about that. In the meantime, consider looking into our Patreon. Not only does it keep high quality rope education available for everyone, but there are lots of bonuses on there for people who donate.